| Most homes are created with some form of a garden or rooftop getaway but in the end, the owner is left with an area that is barren – what to do? Either placement of an out of turn decor piece is made or it is left blank. This should help resolve this issue… Enjoy.
As you can see by the list of items, this is a lockdown hog – so if you are preparing your house, you can build it with the cornerposts and use them to build off of instead of the torches to save lockdowns. |
Items Needed:
- 2 benches
- 1 Small Wooden Table
- 1 Pitcher of Red Wine
- Grapes (as many as you like)
- 21 Torches
- 10 Nightshade
- 1 “tail pointing left” Ball of Yarn dyed green
- 1 “no tail” Ball of Yarn dyed green
- 1 “tail pointing right” Ball of Yarn dyed green
- 4 Dark Cabbage
- 3 Light Cabbage
|
|
| First item up for business is the difference between the “light” and “dark” cabbage. All can be obtained from the southermost field in skara just left of the road (the four rectangular fields producing carrots, onions, lettuce and cabbage). |
| The difference between these cabbage is their placement on the tile. Placement was covered in the tutorial for garland (here) but here is a brief overview.
Light Cabbage, when placed on a tile will land on the north side. The Dark Cabbage will land on the south side of the tile. The color variance is VERY slight, but we will refer to them as light and dark in this tutorial. |
|
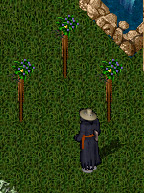
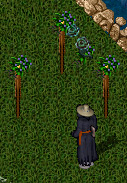
| The first post to be built will be the corner post. Stack, light and lockdown 7 torches. Top the pile with 2 Nightshade.
Repeat this for the other two “outside” posts leaving 1 tile open between them and the corner post.
You should have something that looks like what I have to the right. On to the hard stuff 🙂 |
|
| Now you have posts, its time to give it the draping vine effect between the posts. This is not as bad as it looks, just a matter of keeping what kind of cabbage you are using in mind – light vs. dark as explained earlier. |
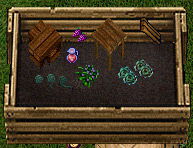
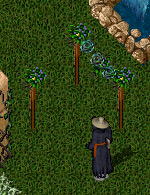
| Between the top two posts, drop the Ball of Yard with the right pointing tail – lock it down and raise it 7 placements. Next, place a light cabbage on the corner post pile. Lower it 3 times.
Place a dark cabbage on the same tile as the yarn you just raised. Lock it down and raise it 10 times.
Place a single nightshade down on the same center tile and lock it down. Raise it 5 placements.
Let’s take a picture of what we have just so you know if you have everything in it’s place… |
|
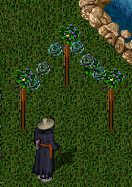
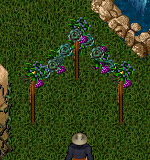
| The next trick here, to finish up the north side of your garland, is to place a light cabbage on the tile north of the tile that is center the two posts. When you drop it, it will appear to “almost” be part of the garland.
You can simply get it in place by raising it 4 placements.
Now that the north side of the garland is done, you can “play” with how much you want it to drape by raising and lowering all the components. I like mine a little more taunt than most, but it will work just by making it appear “pleasant” to your eye. |
|
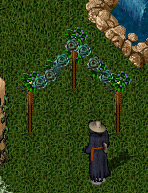
| Time to start on the west side of the garland.
Place a light cabbage on the southern post. Lower it 2 placements. On the center tile between the two posts, place a dark cabbage and a light cabbage.
Raise the light cabbage 8 placements. It should be almost even to the other cabbage on the other side of the center post. Now raise the dark cabbage 7 placements.
You should have something like this image: |
|
| Now we are going to make the west side of the garland appear as full as the north.
Using the same illusion we did before, drop a no tail ball of yard on the tile west of the open center tile between the two posts. Raise it 3 times.
Again using that same illusion, drop a “tail pointing left” ball of yarn and raise it 6 times.
Drop a dark cabbage onto the corner post tile and then drop 2 nightshade on top of it. Lower that nightshade 6 placements.
Drop the remaining nightshade using the “illusion” for the west garland strand. Raise it 6 times. |
|
| Again, as you did with the last strand of garland, it is time to “eyeball” it. Lower the pieces you feel make the garland “too taunt” and those that might be too low for your liking.
This is purely decorator’s preference. |
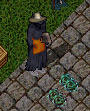
| The final touches to this piece are to add some grapes to your harbor – of course, without grapes, this piece is still very much a finished look. The grapes are optional.
I’m not going to tell you where to specifically add the grapes to your garland as it is, again, up to the preference of the decorator.
The picture to the right is what I got after I added grapes. |
|
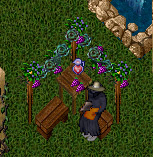
| And now… furniture! Can’t expect your guests to just stand. 🙂
I added a small wooden table at the base of the corner stone and decorated it with a pitcher of wine and a couple grape bunches – very festive and matches the harbor itself.
Next to the table, facing inward, I have placed 2 benches.
Leave the house and allow it to reload for you and adjust corner nightshade as necessary.
Voila – A Grape Harbor Hideaway! |
|
| As a note – you can expand this design by simply adding more posts and placing garland between each, following the instructions based on which side you have added to. |