This Grand Piano instruction set is from MaidenChina’s decoration kits she used to sell on a number of shards. MaidenChina no longer plays UO, but gave permission for these instructions to be replicated here.
|
Items Needed:
- 3 writing tables
- 2 chess boards
- 1 cloak
- 1 body sash
- 4 stacks of cloth in a bag
- Decorating tool
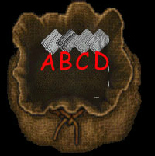
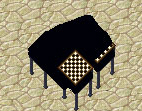
The cloth in a bag should look like the second image. There are four types of cloth that can be purchased from tailor vendors and they look like the ones in the image. You will need this many of each type:
- 7 A cloth
- 6 B cloth
- 12 C cloth
- 3 D cloth
Note: It is extremely important you follow the instructions to the letter. If it says to place 2 of cloth A and 2 of cloth C, do it in that order. Do not place cloth C first and then A as it will mess up the instructions.
WARNING! The Grand Piano is extremely difficult to build. If you get frustrated, sit back and relax for a few minutes, then come back to it.
|


|
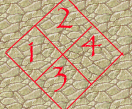
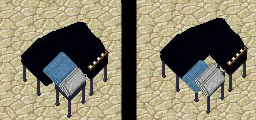
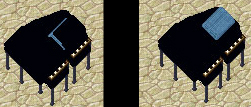
| These are the 4 Tiles that we shall be working with. I have labeled them here for easy reference as we go on. Feel free to look back up here as you build to be sure which tile you are building on. |
 |
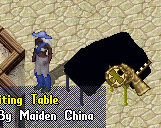
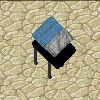
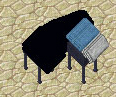
| The Back Left Tile: Tile 1
Place the writing desk on Tile 1 (check diagram above if you are unsure which is Tile 1). Use your decoration tool to turn the desk as seen in the picture. |
 |
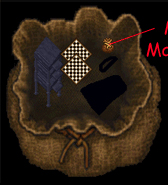
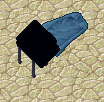
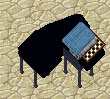
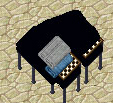
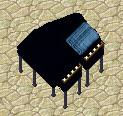
| Place 2 of cloth C down on the table. Then place 2 of cloth D on the table. In the picture, Cloth C is dyed blue. Yours may be dyed black, however, you are free to dye the cloth an easier color to see, just make sure to dye it back to black and lock it down.
Lower each stack of cloth 2 times with your decoration tool. When Cloth C is lowered, D will drop down one on its own. Go ahead and still lower Cloth D two times. Your cloth should look like the bottom picture to the right. |


|
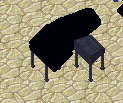
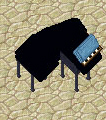
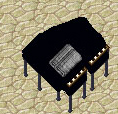
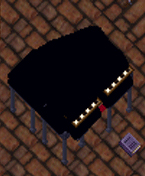
| If you haven’t done so already, unlock and dye the cloth black and relock it down. Now, place two more C cloth on top of the stack, then 1 D cloth. Lower each stack of cloth one time wtih the deco tool. Unlock them, dye them black and relock them.
Tile number one is finished. Your piano should look like the bottom image to the right. |

|
| The Back Right Tile: Tile 2
Onto Tile 2 – be sure to check the diagram above if you are unsure which tile is Tile 2.
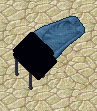
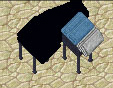
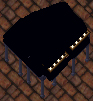
Place the cloak on Tile 2 – I have dyed the cloak blue for easier reference. Yours can be dyed black to do this step.
Raise the cloak two times with your deco tool. The piano should now look like the bottom right image. And Tile 2 is now finished. |
|
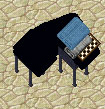
| The Front Right Tile: Tile 4
Place the writing desk on Tile 4. Use the deco tool to turn the desk as you see in the top picture on the right.
Place two of Cloth A down. Then place two of Cloth C down. It should look like the middle picture.
Lower each cloth once. It should now look like the bottom image. |
|
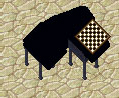
| Place a chessboard down, lock it and lower it one.
Your piano should now look like the image to the right. |
 |
| Place one Cloth B down. Then put two Cloth C on top of it.
Lower cloth C one time. Leave B as it is. Do not lower or raise the B cloth. |
|
| Place one Cloth A on the tile. It should land perfectly and look like this. |
 |
| Place two of cloth B, lock it down, lower it one time. |
 |
| This is what the Piano should look like now. |
 |
| Use your deco tool to turn the writing table (see diagram on how to turn it) |
 |
| Piano should now look like this: |
 |
| The Front Left Tile: Tile 3
Place the writig desk on Tile 3. Use the Deco Tool to turn the desk as seen in the picture. |
 |
| Place two of Cloth A. Then place two of cloth c (Left picture). Lower Cloth A once. Lower Cloth C Three times (right picture) |
 |
| Place the chessboard on Tile 3.
Do not lower or raise it. |
 |
| Place one Cloth B and two of CLoth C. Lower Cloth C once. |
 |
| Place one Cloth A. It should land perfectly like this. |
 |
| Place 2 Cloth B. It should also land perfectly. |
 |
| Touching Up the Piano
Raise the B cloth (highlighted blue in the picture) one time with the deco tool. |
 |
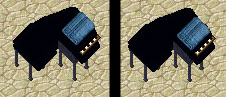
| Raise the Cloth C (highlighed blue in the picture) two times with the deco tool. Left diagram is before raising, right is after raising. |
 |
| Add a body sash on tile 4. It should fall to the ground even though the piano is done. Just target the floor under the legs. Use your deco tool to raise the sash one time.
In the image, the sash is dyed red for visual purposes. It will be black when you do it. |
 |
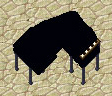
| And here is the finished piano.
|