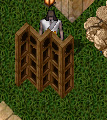
| The changing table is a rather confusing piece to construct but not so much in the level of difficulty. It can be modified from size and height from what I am designing in this tutorial; however I am building this one to actually hide a person to change. |
| Items Needed:
|
|
| The screen is built on a diagonal which I believe is the biggest “catch” people run into. They try to build on a line that isn’t there – this is truly an optical illustion – built from west to east.. |
| The changing screen, unlike many decor pieces, will be built from left to right. The first step is to build your first 2 panels. You will do this by stacking and locking down 6 clockframes.
Turn the top three clockframes to face south. |
|
| We will prepare our 2nd panel by moving to the right one tile and stacking 6 more clockframes and locking them down
Again, repeat turning the top three clockframes. |
|
| We will now prepare out last screen by simply placing the remaining 3 clockframes and locking them down on the tile to the east of panel 3 and 4. |
|
| Now comes the more complicated part of lining all the frames up to create the illusion of a diagonally placed changing screen.
You will start with the first panel you created. The first step is to find a design that you want your panel to have – the design is made by the circle and square hole in the clockframe.
For my example, I will be raising the top frame 5 times and the middle frame 3 times.
Raise the bottom frame 1 time. |
|
| The next step is to lower and raise the next panel to “match” that of panel 1. Because you might have used a different pattern in your panel – I will be giving you the numbers I used for my example.
Raise the top clock frame 1 position.
I lowered the bottom frame 3 times (note, frames in my first panel did fall, so I had to realign them by raising the middle frame back up 2 placements!) |
|
| We are now ready for panel 3.
For my example – I raised the frames for panel 3 as follows:
Top clock frame was raised 9 times.
Middle frame was raised 7 times.
Bottom frame was raised 5 times. |
|
| Now.. panel 4 and we are almost there!
Raise the top clock frame 5 times.
Raise the middle clock frame 3 times.
Raise the bottom clock frame 1 time. |
|
| Last but not least – panel 5.
Raise the top clock frame 13 times.
Raise the middle clock frame 11 times.
Raise the bottom clock frame 9 times. |
|
| Voila – a changing screen!
Note: if you chose a different pattern for your wooden panels – your raising and lowering will be different than mine. Just keep the top and bottom of the panels aligned and it should work just fine. |

